

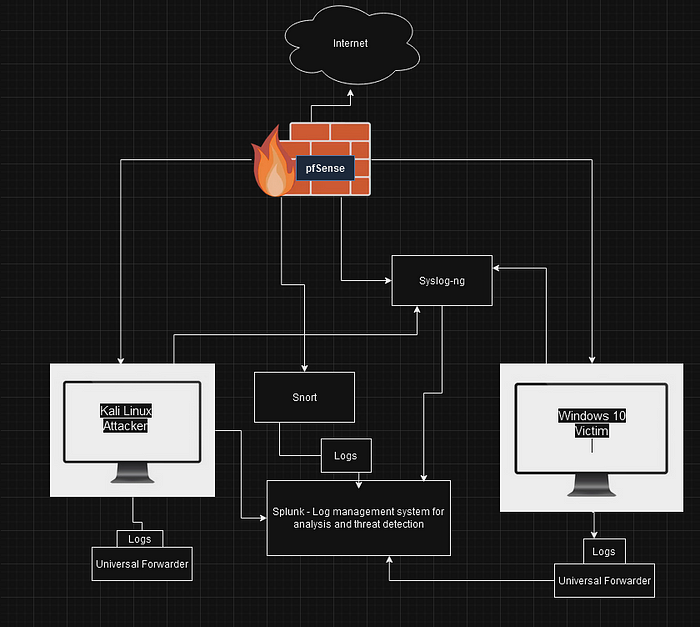
Network Architecture Overview
Refer to the diagram below for the environment layout:
Components:
-
pfSense Firewall: Manages traffic and logs, forwards to Syslog-ng.
-
Kali Linux (Attacker): Performs simulated attacks.
-
Windows 10 (Victim): Target machine for exploitation.
-
Snort IDS/IPS: Detects and logs intrusions.
-
Syslog-ng: Centralized log collector.
-
Splunk: Log management and security event analysis.
-
Universal Forwarders: Installed on endpoints to send logs to Splunk.
Step-by-Step Installation and Configuration
1. Install and Configure pfSense Firewall
Download pfSense:
-
Get ISO from: https://www.pfsense.org/download/
Installation Steps:
-
Create a VM or bare-metal setup.
-
Assign at least 2 network interfaces:
-
WAN: Connects to Internet.
-
LAN: Internal network.
-
Basic Configuration:
-
Assign IP addresses to interfaces.
-
Enable DHCP for LAN if needed.
-
Access Web UI at
https://[LAN_IP] -
Configure firewall rules to:
-
Allow traffic between devices.
-
Enable logging for all allowed/blocked connections.
-
Syslog Forwarding:
-
Go to Status → System Logs → Settings
-
Under Remote Logging Options:
-
Enable sending logs to Syslog-ng server.
-
Specify IP, port (default 514), and log categories.
-
2. Deploy Kali Linux (Attacker)
Download ISO:
Installation:
-
Install on a VM.
-
Connect to the same LAN network as pfSense.
Update System:
Install Splunk Universal Forwarder:
Installation:
Configure Forwarder:
Install Attack Tools:
Pre-installed in Kali (Metasploit, Nmap, Hydra, Hping3)
3. Install Windows 10 (Victim)
Installation:
-
Install on a VM or physical machine.
-
Connect to the same internal LAN.
Configure Event Logging:
-
Open Event Viewer and enable logging for:
-
Security
-
System
-
Application logs
-
Install Splunk Universal Forwarder:
-
Download the Windows installer.
-
Run installation wizard.
-
Configure to forward logs to Splunk Enterprise server.
Monitor Specific Logs:
Add Windows logs in Forwarder Management.
4. Install and Configure Snort IDS
Installation (Ubuntu-based VM):
Configuration:
-
Edit
/etc/snort/snort.conf -
Set HOME_NET to your internal subnet.
-
Enable logging to
/var/log/snort/
Test Snort:
Forward Logs to Syslog-ng:
Modify Snort config or set log forwarding using:
5. Install and Configure Syslog-ng
Installation (Linux VM):
Configuration File:
Edit /etc/syslog-ng/syslog-ng.conf
Add sources, destinations, and log paths for:
-
pfSense logs (UDP/TCP 514)
-
Snort logs
-
Local system logs
Example:
Restart Service:
6. Install Splunk Enterprise (Log Management & SIEM)
Download:
Installation (Linux VM):
Access Splunk:
-
Web UI:
http://<splunk_server_ip>:8000 -
Default login:
admin / changeme
Add Data Inputs:
-
Go to Settings → Data Inputs
-
Add:
-
TCP/UDP inputs for Syslog-ng (port 514)
-
Forwarder Management to receive from Universal Forwarders
-
Create Dashboards and Alerts:
-
Go to Search & Reporting
-
Build queries:
-
Set up custom alerts for abnormal activities.
Simulating Attacks and Detection
Example Attack Tests (from Kali):
-
Ping flood:
-
Port scanning:
-
Brute-force SSH:
-
DDoS simulation:
Monitor:
-
In Snort console logs
-
Syslog-ng collected logs
-
Splunk dashboards and alert triggers
Optional Enhancements
-
Add Suricata alongside or instead of Snort.
-
Replace Syslog-ng with ELK stack for log aggregation.
-
Deploy Wazuh agent for EDR (Endpoint Detection & Response).
-
Use VLANs/subnets for better network segmentation.
FAQs
1. What is the purpose of using pfSense in this cybersecurity lab?
pfSense acts as the central firewall and router within the lab, controlling and monitoring all traffic between devices on the internal network and the external internet. It also generates valuable log data on allowed and blocked connections, which is forwarded to Syslog-ng for analysis in Splunk. This setup mirrors how enterprise firewalls manage and log traffic in real-world environments.
2. Why is Snort important for intrusion detection in this setup?
Snort is a widely-used open-source Intrusion Detection and Prevention System (IDS/IPS). It inspects network packets for malicious activities such as port scans, DoS attacks, and exploit attempts. In this lab, Snort monitors traffic between the attacker (Kali Linux) and the victim (Windows 10), logging suspicious activity that can be reviewed through Syslog-ng and visualized in Splunk dashboards.
3. How does Syslog-ng integrate with Splunk for centralized logging?
Syslog-ng serves as the centralized log collector, receiving logs from multiple sources like pfSense, Snort, and the system logs of connected devices. It standardizes and forwards these logs to Splunk using TCP or UDP connections. In Splunk, these logs are indexed, searchable, and can trigger real-time alerts or visualizations for security monitoring and incident response.
4. What kinds of attacks can be safely simulated in this lab?
This isolated lab environment allows safe simulation of various attacks, including:
-
Ping floods and DoS simulations
-
Port scanning with tools like Nmap
-
Brute-force login attempts using Hydra
-
Exploitation exercises via Metasploit
-
Custom packet floods using Hping3
These simulations provide valuable detection, logging, and response practice without any risk to production infrastructure.
5. Why install Splunk Universal Forwarders on both Kali Linux and Windows 10?
Installing Splunk Universal Forwarders ensures that both endpoint devices send their local system and application logs directly to the central Splunk server. This enhances visibility into:
-
System events
-
Login attempts
-
Error messages
-
Attack evidence on the victim machine
-
Attack commands executed from Kali
Forwarding these logs enables comprehensive incident analysis and correlates endpoint activity with network traffic logs.
Conclusion
This cybersecurity lab setup provides a complete, controlled environment for learning, simulating, and analyzing cybersecurity incidents. From deploying pfSense as a firewall to configuring Snort for intrusion detection, centralizing logs with Syslog-ng, and managing events with Splunk, each component mirrors real-world security infrastructure.
By simulating attacks from Kali Linux and analyzing their impact on Windows 10, students and security professionals can hone their skills in:
-
Threat detection
-
Log analysis
-
Intrusion prevention
-
Incident response workflows
This environment is ideal for both academic learning and professional upskilling, offering hands-on experience with enterprise-grade security tools.


